Monday, June 29, 2009

NECC: Stories from the Worldwide Scratch Community


NECC Session: Stories from the Worldwide Scratch Community


Mitch Resnick of MIT discussed how teachers can help students learn to create, build, and invent in the digital world. Digital natives are comfortable with interacting with technology, but they tend to need support to create and build things with technology tools.

Scratch is a free download from the Internet where you use building blocks of programming to create stories, games, and animations and share them with the web. By utilizing the programming blocks, students do not spend weeks and weeks writing code. Instead, the focus of Scratch projects is on creating content instead of programming code. Most of the users are between 9 – 16 years of age and have uploaded a variety of projects to the Scratch website such as Barack vs. McCain games, advertisements, announcements, science simulations, birthday cards, games, and remixes of other scratch animations. But the best part of Scratch comes with the collaboration among users. By posting animations and creations to the Scratch website, users can take those animations and remix them into a new creation.

Before I attended this session, I toured different student Scratch projects in the Student Showcase section of the conference. I was amazed that I saw students as young as second grade explain how they create their projects in Scratch. The only disheartening piece that I heard from them is that most of these students learned about Scratch in after-school programs or Saturday school clubs. Ideally, I’d love to see Scratch integrated into the school day so that this program is available to all students.

NECC: Authoring Books with CAST Book Builder


At NECC I had the pleasure to attend a session called "If You Build It, They Will Read It: Authoring Books With CAST Book Builder" by Loudoun County Public Schools in Virgina.

The technology specialists presented about Book Builder, which is a FREE tool that allows you to create books online to adapt to the needs of your students. It is a free online authoring tool for educators and students. Book Builder has three characters to guide student thinking as they read the book: Pedro, Hali, and Monty. Pedro engages the affective networks by prompting readers to actively think about the text. Hali engages the strategic network by providing hints. Monty engages the recognition network by offering models of expert strategy use and think-alouds. The best part about the coaches is that you can customize them to make them say whatever you want to help children with their reading strategies.

Book Builder was created with the "design for all" concept of Universal Design that focuses on three principles: Representation, expression, and engagement. A teacher creates one account but multiple students can use to create their own books. Multiple users can create separate books on the same accounts with no problem. In fact, if students want to work on the same book at the same time, they can as long as they are on different pages. Book components can include: text, pictures, and recorded sound. There is also a multimedia glossary and 3 coaches (described above) to guide students' thinking as they read. The iTRTs that presented student books from Book Builder also passed around the book once it was printed out. They added symbols to each word in the story in a binder so that kids could have a print copy and not just a digital one.
Post any thoughts you have on Book Builder to the presenters' AT Tips Blog. For a link to their presentation, visit their website. There is also links to handouts of fold out pocket mods and videos on how to use it.

Friday, June 26, 2009

I'm Quoted on Common Craft's Site

A few months ago, Lee LeFever asked for teacher educator feedback on his Common Craft videos that feature different technology tools. I enthusiastically responded since our county has been using Common Craft as part of our county-wide trainings over the last two years. One of my teammates saw that my comment was posted on Common Craft's website and forwarded it to me:

http://www.commoncraft.com/files/video_factsheet/Fact_Sheet_Twitter_Search.pdf

Having said this, I highly recommend using Common Craft videos to help explain technology tools to other people. Enjoy!

Tuesday, June 16, 2009

Promethean ActivInspire: Importing Resource Packs

If you have downloaded resource packs from Promethean Planet and are having trouble importing the resources into Inspire, follow these directions to correct the problem:


On the top menu bar, choose File > Import > Resource Pack to My Resources.
Then browse to your resource pack and open it. You should see your resources appear in the “My Resources” section of the resource library.


I chose to have you put the resource pack in “My resources” instead of “Shared Resources” because you will be able to find them easier. Once the pack is imported into Shared Resources, you may not have control over which folder your resource pack goes to, and then you have to click through several folders to try to find it.

Related Posts:

Promethean Pen Troubleshooting

ActivInspire: Using the Fill Tool to Change Font Color

Promethean Pen Troubleshooting


Please be sure watch your Promethean Pens carefully. It's actually a good idea to lock them up in a safe place when you are not going to be in the room. Also, when students come to the board to use the pen, be sure to check the tip of the pen for the nib. (See picture above) Students can actually yank the nibs out if they pull hard enough on them. Without the nib, the Promthean pen is disabled. If you find yourself in a situation where you have missing nibs, call Promthean at 1-888-652-2848 and they will send replacements free of charge. *Please note: it is better to call Promethean directly than to email them using their support address. They rarely repond to emails.
Related Posts:

Photo Story: Adjusting Music


There is an option in Photo Story to add music to your slideshow. However, some users have discovered that if there is already spoken narration added to the slideshow, the addition of music can overpower the narration. For the most part, it is recommended that you do not include music if there is narration in the show because it can be difficult for some individuals to hear. But if you find that both narration and music are necessary, here is a tip where both can be used in harmony. On the "Add Background Music" step in Photo Story, be sure to slide the "volume slider" down to the "low" end. Then preview your slideshow. If the music is still too loud, slide the volume slider even closer to the "low" end. The volume slider will only lower the volume of the music, not the spoken narration.

Related Posts:

Monday, June 8, 2009

Spice Up My Slideshows!!


Are your students bored with regular lecture slideshows? Or even worse, are you trying to integrate technology by having your students create digital content, but you are stuck in having the kids create PowerPoint presentations? Time to spice up your digital content!

Alternatives to PowerPoint:
  1. Promethean Flipcharts: For those of you with Promethean boards or ActivSlates, you should make use of downloading pre-made flipcharts from Promethean Planet, or better yet, make your own. Remember to incorporate interactive features so that students are interacting with the board.
  2. Prezi: Unlike anything I have seen before, this site boasts that it is the "zooming editor for stunning presentations". Create your presentation online, and zoom into different parts of the lecture to create an interesting visual display.
  3. Slide Rocket: This online tool allows you to upload photographs and present them in a unique way. It reminds me a bit of Cool Iris.
  4. My Plick: Upload your PowerPoint file, add audio, and sync the audio to your slides to make an audio narrated slideshow. This is a good alternative for teachers teaching other teachers, or to make presentations that you want to post online for students to review content.
  5. SlideShare: Upload your PP to slideshare so that you can embed them into websites, wikis, and blogs.
  6. Show Beyond: Upload your slideshow and add audio narration.
  7. Bubble Share: Slideshows from your pictures
  8. Rock You: Add pictures, text, and music to these slideshows and embed in blogs, wikis, or webpages

Want Students to Create Digital Media?

  1. One True Media: mix your photos and video to create a masterpiece
  2. Photostory: Free download from Windows. Create picture slideshows, add audio narration for a better way to convey information. Students don't spend their whole computer lab type retyping their research into PP slides. Instead, they can record their voices to add their information.
  3. Stupeflix: Turn your video, pictures, and text into professional looking videos.
  4. MovieMaker: Capture footage from a Flip Video Camera or edit some editable footage from Discovery Streaming to create movies around a content area. Free with Windows - check your computer if you have a relatively new one. You probably have it already.
  5. FreePath: Mix slides, videos, web content and more.

There are many, many more options, but these should get you started! Do you have a favorite tool for slideshows or presentations? Leave your comment to keep the ideas coming!

Photo from flickr.com - by scragz.

12 Essential Technology Tools for Education

I found this article last week about the "Twelve Essentials for Technology Integration" by Richard Byrne, author of Free Technology for Teachers. He includes free sites for:
  • creating documents and presentations
  • communicating
  • creating collaborative projects
  • alternatives for YouTube

This is a digital article which means you can turn the pages right on your laptop, zoom into the pages to read them full size, and click the links Mr. Byrne has embedded into it.

I tip my hat to you, Mr. Byrne, for creating a concise, informative document that many teachers will find beneficial.

Pixie Quick Tip: Gluing Stickers onto the Background

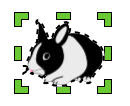
Are your students frustrated that stickers are moving around in Pixie when they want them to stay in place? You can use the "glue bottle" feature to glue things to the background of your painting. Once a sticker is glued into place, you can now erase parts of the sticker or draw and paint on top of it. To glue a sticker into place, first add a sticker to your canvas.
On the sticker above, you can see that the green handles are activated when you click on the sticker. This means that the sticker is currently floating on top of the canvas. Any drawing or painting you will do will go behind this sticker. To glue it in place, click the sticker to select it and choose the "Options" tab on the right. On the options tab, click the "Glue Bottle".

Once you click the glue bottle, the sticker is stuck to the canvas so you can erase parts of it or draw on top of it. Now when you click the sticker, it will no longer have the green handles since it cannot be selected (See below) because it's stuck to the canvas.

ActivInspire: Using the Fill Tool to Change Font Color


Did you know you can change the font color with the fill tool (paint bucket icon) in ActivInspire? As long as you choose a big, chunky font, you can change the color of the font of an ENTIRE word by clicking on any letter in the word with the fill tool. This is an easy method to make plain text on a flipchart into an interactive activity for kids. Have the kids color code text for:
  • Parts of Speech
  • Main idea/detail
  • Characters, setting, problem, solution
  • Keywords
  • New Vocabulary and Definitions
  • Prepositional phrases, clauses
  • Etc.

Sunday, June 7, 2009

History in Pictures

The American Image: The Photographs of John Collier Jr. is a site where you can see how photographs have changed since the 1940s. Also users can create their own propaganda to study how propaganda is used in the public within this site.


Picturing the Century is sponsored by the National Archives and spans over 100 years in history. In addition to browsing the pictures online, you can order reprints from their catalog.


The Way We Worked: a site that documents in photographs how the workplace has changed since the 19th century. Pictures of how we worked, where we worked, what we wore to work, dangers at work, and more are displayed.


Life Magazine: Photographs show current issues as well as historical events.

Create Stories Online: Digital Storytelling Sites


Myths and Legends Story Creator is a great site for kids who love to create stories. Not only can you create stories with several backgrounds and clip art pieces to choose from, but you can also read and listen to stories that other students have written. Click "Play" to play the story and watch as the stories animate and you can follow along with the narrator. Try making your own and sharing it with friends!


Story Top story creator is an online application similar to Myths and Legends (above) but with fewer choices. The website utilizes a drag and drop interface where you choose backgrounds, characters, and objects. Add text to your story. Choose to save it to the Story Top account or send your story to a friend when you are finished.

Related Posts:
Read, Write, Think: Comic Generator
Audio Books Online
UDL Book Builder

Tuesday, June 2, 2009

Summer Math Practice


The last post was about summer reading practice, so it only makes sense to follow up with summer math practice! Parents often ask me how they can practice basic skills with their children over the summer. Begone, worksheets and workbooks! Look online for some of the best math practice and manipulatives to help you work on your math skills:

Monday, June 1, 2009

Summer Reading Practice


Are you looking for sites to encourage your students to read, listen, and connect with books over the summer? Here are a few to get you started:*

*(As with any site, preview it before you decide if it is age appropriate before you give it to your students).

UDL Book Builder


The UDL (Universal Design for Learning) Book Builder is a site where you can read, explore, create, and share digital books that build reading skills for your students. UDL Book Builder also provides three coaches that you can build into your books. (See the 3 little characters at the bottom of the book page?) When you click on a character, the character will speak (and show a text bubble) as it guides the students through different reading skills, such as predicting, clarifying, reading for meaning, etc. In my opinion, this feature alone is what sets this site apart from the rest. I haven't seen any site like this that allows the user to create the book, add images, and add reading coaches! UDL Book Builder provides links to free text, free images, free reading strategies, etc that will help you create your book. You will need to sign up for a free account to fully explore the site, but it's worth it!