Showing posts with label photostory. Show all posts

Tuesday, June 16, 2009

Photo Story: Adjusting Music


There is an option in Photo Story to add music to your slideshow. However, some users have discovered that if there is already spoken narration added to the slideshow, the addition of music can overpower the narration. For the most part, it is recommended that you do not include music if there is narration in the show because it can be difficult for some individuals to hear. But if you find that both narration and music are necessary, here is a tip where both can be used in harmony. On the "Add Background Music" step in Photo Story, be sure to slide the "volume slider" down to the "low" end. Then preview your slideshow. If the music is still too loud, slide the volume slider even closer to the "low" end. The volume slider will only lower the volume of the music, not the spoken narration.

Related Posts:

Monday, February 9, 2009

Photostory Quick Tip: Saving as a project vs. Saving as a final movie

Many teachers are confused about the 2 different ways to save in Photostory. Let's take a look at why would need to save in different ways in Photostory.

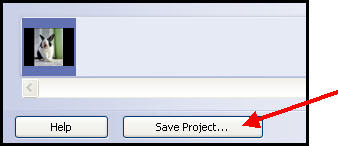
1. The first way you can save is as a "project", which indicates you are NOT done with the Photostory and you need to come back to it at a later time to finish it. You can save a project at any time in the program by clicking "Save Project" at the bottom of the screen. (see below)


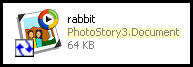
The file will have the extension .wp3, which stands for Windows Photostory 3, and it has the Photostory icon attached to it (see picture below). This is a signal to you that you have NOT saved in final form. This file cannot be opened it Windows Media Player; it can only be opened in Photostory. Therefore, you should only save in this form if you want a back-up of your project or you think you are going to edit it at a later time.

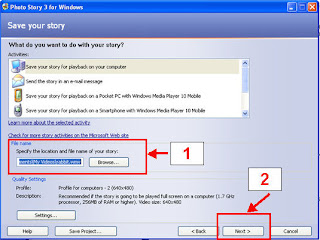
2. The second way to save is in final movie form. This will transfer your Photostory project into a Windows Media Video file (.wmv). You want to save in this format when you are finished because all of the media becomes part of the final movie and you can now show the movie on any computer that has Windows Media Player. It won't need Photostory software installed to play. To do this, you need to click "next" to arrive at the screen that says, "Save Your Story". See screen below.


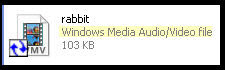
At this point, it will default to saving your Photostory movie in "My Documents" in "My videos" unless you browse to a different folder (See step one). It will also default to naming your movie "Photostory 1" unless you change the name of it here (see step 1). If you have a whole class saving to the same folder, it's important that they change the name of their Photostory, or everyone will overwrite each other's movies. After you have named the movie and browsed to the appropriate folder to save it to, you need to click "Next" to finish the process. You will see the final movie with the extension .wmv and the icon will look like the Windows Media Player icon. (See picture below) When you double click the file to play it, it will now open in Windows Media Player, and not Photostory.


RELATED POSTS:

Digital Storytelling with Photostory 3

Day of Discovery

Sunday, December 28, 2008

Kitzu offers multimedia options for teachers and students


Kitzu is my newest find! I mentioned it briefly in an earlier post, but I finally had a chance to look at it this weekend. Kitzu offers free, copyright-friendly, and educational media packages for teachers and students to use in multimedia projects. Most packages include about six pieces of media around an educational theme from the 21st century that can include images, documents, audio clips, video clips, and illustrations. As a teacher, download one of these kits to use with your whole class. You will be amazed that each student uses the media differently to create a unique project. For teachers who do not know where to start, Kitzu is the perfect first step for integrating with PowerPoint, Photo Story, Movie Maker, or Adobe Premier Elements.

MD, VA, DC Day of Discovery

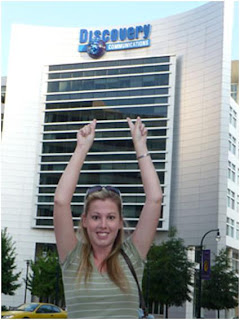
On Wednesday, August 13, 2008 I traveled to Silver Spring, MD for “The Day of Discovery” at the Discovery Communications Headquarters. In addition to breakfast, lunch, and wonderful door prizes, we were treated to two keynote sessions and three break out sessions that taught us how to incorporate “Discovery Streaming,” a paid subscription to a site that is packed with educational multimedia for teachers to use.

Scott Kinney presented on “The Media Evolution”. He supported the idea that media should be incorportated into the classroom as an instructional aid since 8-18 year old children spend 6 1/2 hours a day with media of some kind. Many teachers do not realize all of the skills that are needed to create media for school projects: researching, locate and gather resources, prewriting, writing, editing, storyboarding, and reading fluency skills.

Hall Davidson, Director of the Discovery Educator Network, presented on “Digital Media with Students in the Classroom.” He discussed scaffolding the use of digital media in student projects until students are comfortable with the skills. For example,
  1. Begin with creating PowerPoint presentations and embed videos from Discovery Streaming.
  2. Create slideshows from your digital images in Photo Story.
  3. Create videos and movies with narration in Movie Maker.
  4. Finally, create movies in Adobe Premier Elements and introduce chromakey skills to the kids.

In addition, Mr. Davidson told us about Kitzu, a website of resources for digital media for student projects and Jakesonline, a site of wonderful tutorials to get you started.

Matt Monjan presented “50 Ways to Integrate DE Streaming”. While most of this was a review since I saw matt speak a few times before, I still learned a few new tricks. For example, I discovered that you can now insert embeddable code, or widgets, into DS’s writing prompts and you can add more than one image. Also, if you search “AFI” in Discovery Streaming, you will find several film making video resources to use with your students.


Hall Davidson also presented on “Teaching with Cell Phones”. I spent most of the time on my phone so I forgot to write most of it down. However, I learned that you can podcast directly from your cellphone using Gcast.com. You can also upload video directly into YouTube from your cell phone. And did you know that you can take a poll from your phone using text massaging and see the results live on polleverywhere.com? I tried this out - SO COOL. Or try this one - if you send a text message that includes a fast food restaurant and a menu item to 34381 you will receive a message with all of the nutritional information about that food item. For example, text “McDonald’s Big Mac” to 34381, it will tell you how many grams of fat you are about to enjoy.
Dennis Swain presented “Embedding Multimedia: PowerPoint Presentations that Pop!” While I knew that we could embed videos and hyperlink to videos, I didn’t realize you could embed videos and still have all of the controls of Windows Media Player available (play, rewind, fast forward, etc). To do this, open PowerPoint and go to a slide.

  1. Click the “View” button on the top toolbar.
  2. Click “Toobars” and “Control Tool Box”.
  3. Click on the “hammer” button.
  4. Scroll to “Windows Media Player” and select it.
  5. Crosshairs will appear. Draw a box on the slide where you want the video to appear.
  6. Right-click the box. Choose “properties”.
  7. Click on the three dots on the box. (…)
  8. Browse to where your downloaded movie is on your computer. Select it.
  9. Under “playback options”, uncheck “auto start” and check “stretch to fit.”
  10. Click OK.
  11. Now you will see the embedded video with the Media Player controls. While the video is playing, you can right-click the video and choose “Zoom” and “Full screen”. Ta-Dah!


Thank you, Discovery Education!

RELATED POST:

Photostory Quick Tip: Saving as a Project vs. Saving as Final Movie

Wednesday, December 10, 2008

Digital Storytelling with Microsoft Photo Story 3


Digital storytelling is a powerful tool to motivate reluctant writers in the classroom. Microsoft Photo Story 3 is a free download that works on Windows XP and Windows Vista and is incredibly easy to use.

How can you use Photo Story to motivate writing in the classroom? Try these ideas:

1. Write about a field trip using your digital pics from your destination
2. Act out reader’s theater scripts or stories, take pictures, and have children write about the plot, conflict, solution, setting, or theme
3. Visually show your classroom routine using Photo Story
4. Visually emphasize new vocabulary
5. Narrate the steps to a science project or math investigation

There is a visual tutorial of Photo Story for those who like to see what they are downloading before they commit to it. I recommend it if you are one who doesn’t like to “play” around on software in order to figure it out.

Basically, there are 6 steps to creating a photo story.

  1. Open Photo Story and import your pictures using the icon. Select multiple pictures in your folder by using the “shift” or “control” button. Click “upload”.

  2. You’ll see all of your uploaded photos on a filmstrip bar at the bottom of the screen. Click and drag them to change their order in the story. Click “next”.

  3. Add text to the pictures by clicking on an individual picture and adding text in the caption box. By clicking on the “effect” button under the individual photo, you can add and effect such as “black and white”. Click “next”.

  4. Add narration to your story. Using a microphone, click “record” and speak your narration for each slide. When you are done with each slide, click onto the next one and continue speaking. Photo Story will automatically add timings to your photos based on how long you talk. Clicking the “Customize Motion” button under each photo will allow you to choose transitions between photos.

  5. Add background music. Choose your own music from your files or use music provided to you from the software.

  6. Save your story.


That’s it! By including a group of photos in a file folder on a shared drive in your school, you can have students access photos easily to create digital storytelling projects. Try and let me know what you think!