Showing posts with label moviemaker. Show all posts

Monday, February 9, 2009

Movie Maker Quick Tip: Taking a Still Picture from a Video

Are you frustrated that you can't find the perfect picture for your multimedia project but can find the image in a video segment in Discovery Streaming (United Streaming)? If you download the video and import it into Movie Maker, you can take a picture from the video! To do this, import the video. Drag it on the storyboard. Play the movie until you reach the frame that you want to take the picture of and pause it. Once the video is paused, you can click the button "Take Picture" on the lower right. Movie Maker takes a picture from the video, saves it automatically in "My Pictures" and imports it into Movie Maker all at the same time. Sweet! So if you can't find the images you want, make your own!

RELATED POSTS:

Muting the Audio in Movie Maker

Importing Videos into Movie Maker

Sunday, February 8, 2009

Quick Tip: Importing Videos into Movie Maker

Teachers often complain that they cannot import a video clip as one whole segment in Movie Maker. In order to get your movie to import as one segment, be sure to uncheck the box that says "Create Clips for Video Files", then import your video segment. (see picture below)


RELATED POST:

Muting the Audio in Movie Maker

Quick Tip: Muting a Video Segment in Movie Maker

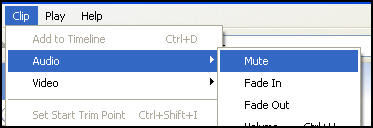
Why would you want to mute the audio to a video segment in Movie Maker? As a classroom teacher, this makes it easy for students to take a video segment from Discovery Streaming and record their voice over it with the facts that they have researched in class. To mute the audio of a segment, you need to be in timeline view. Then select the video, click "Clip" --> "Audio" --> "Mute". If you have more than one video segment, you will need to repeat this process multiple times. (See picture below)


Monday, December 29, 2008

Using Movie Maker in the Classroom


Windows Movie Maker is free video-editing software included with Microsoft Windows XP. With Movie Maker, you can turn footage from your digital video camera into movies, share them on the Internet, and burn them to CD or DVD. Downloadable movies from online sources such as Discovery Streaming can also be edited using this software, just be sure you use a clip that has been flagged for “editing“.
Where can you go to download Movie Maker for your home computer? (Remember, you need to have Windows XP or higher.) Follow the link: http://www.microsoft.com/windowsxp/downloads/updates/moviemaker2.mspx

How can educators justify an educational activity like digital storytelling, which at first glance, seems an unlikely candidate for standards-based education? Ironically, the answer to this question can be found through a careful examination of a series of standards and position statements in the following article: TechLearning Article

Here are some additional resources you can use to become more proficient with Movie Maker:

1. Microsoft’s Movie Maker PageThis page contains various tutorials for the program and an explanation of the software.

2. Mighty Coach Tutorial on Movie Maker

3. Atomic Learning Tutorial on Movie Maker

Classroom Ideas for Movie Maker and/or using your Flip Video Camera:
  1. Edit Discovery Streaming videos to show only section you want to your class
  2. Remix Discovery Streaming videos to put together important concepts
  3. Have students research historical figures. Record their interviews
  4. Create a public service announcement.
  5. Create a commercial for a new product
  6. Record a school tour or classroom tour for back to school night.
  7. Record puppet shows, theater performances, debates, or speeches
  8. Record science experiments
  9. Record weather daily or shadows from the sun throughout the year
  10. Go on a nature walk and record items from your “treasure hunt”
  11. Record when a student has a success or a school project
  12. Download editable videos to create your own movies in Movie Maker. Mute the narrator and record your own facts.

Related Articles:
1. MD, VA, DC Day of Discovery (Using Movie Maker in the Classroom)
2. Testing the New Flip Video Camera

Sunday, December 28, 2008

MD, VA, DC Day of Discovery

On Wednesday, August 13, 2008 I traveled to Silver Spring, MD for “The Day of Discovery” at the Discovery Communications Headquarters. In addition to breakfast, lunch, and wonderful door prizes, we were treated to two keynote sessions and three break out sessions that taught us how to incorporate “Discovery Streaming,” a paid subscription to a site that is packed with educational multimedia for teachers to use.

Scott Kinney presented on “The Media Evolution”. He supported the idea that media should be incorportated into the classroom as an instructional aid since 8-18 year old children spend 6 1/2 hours a day with media of some kind. Many teachers do not realize all of the skills that are needed to create media for school projects: researching, locate and gather resources, prewriting, writing, editing, storyboarding, and reading fluency skills.

Hall Davidson, Director of the Discovery Educator Network, presented on “Digital Media with Students in the Classroom.” He discussed scaffolding the use of digital media in student projects until students are comfortable with the skills. For example,
  1. Begin with creating PowerPoint presentations and embed videos from Discovery Streaming.
  2. Create slideshows from your digital images in Photo Story.
  3. Create videos and movies with narration in Movie Maker.
  4. Finally, create movies in Adobe Premier Elements and introduce chromakey skills to the kids.

In addition, Mr. Davidson told us about Kitzu, a website of resources for digital media for student projects and Jakesonline, a site of wonderful tutorials to get you started.

Matt Monjan presented “50 Ways to Integrate DE Streaming”. While most of this was a review since I saw matt speak a few times before, I still learned a few new tricks. For example, I discovered that you can now insert embeddable code, or widgets, into DS’s writing prompts and you can add more than one image. Also, if you search “AFI” in Discovery Streaming, you will find several film making video resources to use with your students.


Hall Davidson also presented on “Teaching with Cell Phones”. I spent most of the time on my phone so I forgot to write most of it down. However, I learned that you can podcast directly from your cellphone using Gcast.com. You can also upload video directly into YouTube from your cell phone. And did you know that you can take a poll from your phone using text massaging and see the results live on polleverywhere.com? I tried this out - SO COOL. Or try this one - if you send a text message that includes a fast food restaurant and a menu item to 34381 you will receive a message with all of the nutritional information about that food item. For example, text “McDonald’s Big Mac” to 34381, it will tell you how many grams of fat you are about to enjoy.
Dennis Swain presented “Embedding Multimedia: PowerPoint Presentations that Pop!” While I knew that we could embed videos and hyperlink to videos, I didn’t realize you could embed videos and still have all of the controls of Windows Media Player available (play, rewind, fast forward, etc). To do this, open PowerPoint and go to a slide.

  1. Click the “View” button on the top toolbar.
  2. Click “Toobars” and “Control Tool Box”.
  3. Click on the “hammer” button.
  4. Scroll to “Windows Media Player” and select it.
  5. Crosshairs will appear. Draw a box on the slide where you want the video to appear.
  6. Right-click the box. Choose “properties”.
  7. Click on the three dots on the box. (…)
  8. Browse to where your downloaded movie is on your computer. Select it.
  9. Under “playback options”, uncheck “auto start” and check “stretch to fit.”
  10. Click OK.
  11. Now you will see the embedded video with the Media Player controls. While the video is playing, you can right-click the video and choose “Zoom” and “Full screen”. Ta-Dah!


Thank you, Discovery Education!

RELATED POST:

Photostory Quick Tip: Saving as a Project vs. Saving as Final Movie