Friday, February 27, 2009

Concrete Poems and Shape Poems

One teacher asked me how to create a shape poem on the computer. The closest thing I could think of was with the poem builders online.

The concrete poem builder from the UK has many different shapes for kids to choose from or they can draw their own shape with the crayons. After the shape is added to the board, add the words to your poem onto the textbox so you can place them in the shape. When you are finished, print the poem.


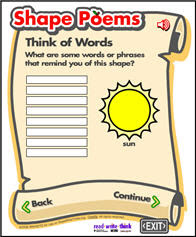
The shape poem builder comes from one of my favorite sites, ReadWriteThink.org. While this site does not allow children to draw their own shapes, it does give them the option of adding text in an easier manner. The shape poem builder also has the option to print the poem when finished.

RELATED POSTS:

Magnetic Poetry

Sunday, February 22, 2009

Pixie Quick Tip: Exporting Paintings as .JPEGs

When you save a painting in Pixie by going to "File" and "Save picture as", most users do not realize that the painting is being saved as a .pxi file (Pixie file). Therefore the picture you created will only open within Pixie software. (See picture below for what a Pixie file looks like.)


Instead, you will need to export your painting as a .JPEG, a picture file that will open in any application that takes pictures, such as Photo Story, Movie Maker, Microsoft Office, etc. To do this, click the "Export" button on the top toolbar and click 'Export'. Then click 'Export' again in the pop-up window so you can choose a folder and a drive to save it to. You're finished!


RELATED POSTS:

Pixie Ideas for the Classroom

Recording Sounds in Pixie

Open a Folder of Pictures in Pixie

Word Games for Elementary Students


Are you looking for a fun way to practice word skills with your students? Here are a few sites that practice important concepts in a fun way, especially if you have an interactive whiteboard to use in your class.
Punctuation Paintball: Use the paintball guns to shoot correct punctuation onto the sentences provided. If you click the website and it asks you to register, choose "Maybe Later" to go directly to the game without adding any personal information. There are 3 different levels of difficulty to choose from.
Other games that can be used to practice word skills:

Related Posts:

Read, Write, Think: Comic Generator
Sight Words with Samson

Saturday, February 21, 2009

Base Ten Block Games


Learning Box has wonderful base 10 block games that work well with your Promethean Board, Polyvision Board, or chalkboard. The first one practices making numbers between 1-999 using base 10 blocks. The student drags the blocks onto the mat, and when the correct number is made, the website cheers and the blocks dance around. (See picture above)

Learning box also has an estimation game with base 10 blocks. As you know, estimation is a difficult concept to teach to elementary school kids, but this is a nice way to show another strategy to master this concept.

Another base 10 block website to practice adding or subtracting numbers is from Arcytech. Even though the graphics are not as refined as the websites from Learning Box, this site has something that Learning Box does not: a hammer a glue bottle. Use the hammer to break apart a hundreds flat into ten rods, or use the glue bottle to glue them back together again. This lends itself to teaching addition and subtraction with regrouping. Check it out!

RELATED POSTS:

Thursday, February 19, 2009

Food Chain Games for Kids


I just came across a food chain simulation by searching other people's bookmarks in delicious.com. Sunny Meadows provides an overview of the food chain, and then allows you to play a game to simulate what would happen "in the meadow" depending on how many predators, prey, and plants you decide to add. As the years tick by, you can watch as the population of animals increase and decrease based on their food supply. This is a great way to teach this concept. Even though the graphics leave much to be desired (see below), the idea is superb and so far its the only one I have found to illustrate this idea.

Here are a few other good food chain games:

PREVIOUS SCIENCE POSTS:

Science Videos on Vimeo

Visit Planet Science!

Interactive Dinosaur Sites

Astronomy Sites for Classroom Use


Visit Mars with Google Mars

Earth Guide


Welcome Google Sky!

Way Cool Science Sites for Your Class

Periodic Table 2008 Style


Make a Wild Animal!

Tuesday, February 10, 2009

Turning Off Overlays in Google Earth

There are many different layers that can be turned on in Google Earth to provide your students with additional information. For example, Rumsey Historical Maps will overlay a historical map over the current image of the earth for you to compare. There are NASA satellite images that you can overlay on top of the earth as well. However, once they are turned on, how do you get them off? I tried clicking the link, "Hide this layer", but the overlay didn't turn off. (See picture of overlay below)When you activate an overlay, the overlay moves from the "Layers" window pane to the "Places" window pane. Once you find the layer in the "Places" window pane, uncheck the box to the left of the layer, and the overlay will be removed. (See below)

Monday, February 9, 2009

Photostory Quick Tip: Saving as a project vs. Saving as a final movie

Many teachers are confused about the 2 different ways to save in Photostory. Let's take a look at why would need to save in different ways in Photostory.

1. The first way you can save is as a "project", which indicates you are NOT done with the Photostory and you need to come back to it at a later time to finish it. You can save a project at any time in the program by clicking "Save Project" at the bottom of the screen. (see below)


The file will have the extension .wp3, which stands for Windows Photostory 3, and it has the Photostory icon attached to it (see picture below). This is a signal to you that you have NOT saved in final form. This file cannot be opened it Windows Media Player; it can only be opened in Photostory. Therefore, you should only save in this form if you want a back-up of your project or you think you are going to edit it at a later time.

2. The second way to save is in final movie form. This will transfer your Photostory project into a Windows Media Video file (.wmv). You want to save in this format when you are finished because all of the media becomes part of the final movie and you can now show the movie on any computer that has Windows Media Player. It won't need Photostory software installed to play. To do this, you need to click "next" to arrive at the screen that says, "Save Your Story". See screen below.


At this point, it will default to saving your Photostory movie in "My Documents" in "My videos" unless you browse to a different folder (See step one). It will also default to naming your movie "Photostory 1" unless you change the name of it here (see step 1). If you have a whole class saving to the same folder, it's important that they change the name of their Photostory, or everyone will overwrite each other's movies. After you have named the movie and browsed to the appropriate folder to save it to, you need to click "Next" to finish the process. You will see the final movie with the extension .wmv and the icon will look like the Windows Media Player icon. (See picture below) When you double click the file to play it, it will now open in Windows Media Player, and not Photostory.


RELATED POSTS:

Digital Storytelling with Photostory 3

Day of Discovery

Pixie Quick Tip: Opening a Folder of Pictures in Pixie

You can open a folder of pictures at one time within Pixie software. As a teacher, this a great feature! You can have your students make pictures within Pixie, save them to the Student Drive in the SAME folder, and open them all at once. Once you open your pictures all at once, you can view all the pictures as a slideshow within Pixie. If you have a prejector in your room, this is a quick and easy way to share your students' work at once time. So how do you do this?


1. Open Pixie and click the "Share" button on the top toolbar. (See below)


2. Then click the "Open a folder of Pictures" button in the lower right-hand side of the screen. (See below)

3. Browse to your folder and click "Open". When you open your pictures, the blank slide will still be there. To get rid of it, right click the blank slide and choose "Close Picture". Now you can click "Start" to begin your slideshow.


RELATED POSTS:
Pixie Ideas for the Classroom
Recording Sounds in Pixie
Exporting Paintings as .jpegs in Pixie

Quick Tip: Recording Sounds in Pixie Software

Did you know you can connect a microphone headset to your computer and record your voice in Pixie software? Many teachers and students overlook this powerful feature. Recording sound on your Pixie picture is a wonderful way to narrate a digital story, add sound effects for a descriptive paragraph, or practice fluency and expression. To record a sound, connect your microphone, click the red record button, speak into the microphone and click the "stop" button when you are finished. (See picture below) Now you can press "Play" button to hear your sound. However, if you click "Share" and view your pictures as a slideshow within Pixie, you can view your pictures in slideshow format and your recorded sound will play automatically. ** Please note: If you export your Pixie pictures as a .jpeg or other file format, you will lose the ability to play the sound. The sound is only attached to "Pixie" files: .pxi files.

RELATED POSTS:

Pixie Ideas for the Classroom

Opening a Folder of Pictures in Pixie

Exporting a Painting as a .jpeg in Pixie

Movie Maker Quick Tip: Taking a Still Picture from a Video

Are you frustrated that you can't find the perfect picture for your multimedia project but can find the image in a video segment in Discovery Streaming (United Streaming)? If you download the video and import it into Movie Maker, you can take a picture from the video! To do this, import the video. Drag it on the storyboard. Play the movie until you reach the frame that you want to take the picture of and pause it. Once the video is paused, you can click the button "Take Picture" on the lower right. Movie Maker takes a picture from the video, saves it automatically in "My Pictures" and imports it into Movie Maker all at the same time. Sweet! So if you can't find the images you want, make your own!

RELATED POSTS:

Muting the Audio in Movie Maker

Importing Videos into Movie Maker

Sunday, February 8, 2009

Quick Tip: Importing Videos into Movie Maker

Teachers often complain that they cannot import a video clip as one whole segment in Movie Maker. In order to get your movie to import as one segment, be sure to uncheck the box that says "Create Clips for Video Files", then import your video segment. (see picture below)


RELATED POST:

Muting the Audio in Movie Maker

Quick Tip: Muting a Video Segment in Movie Maker

Why would you want to mute the audio to a video segment in Movie Maker? As a classroom teacher, this makes it easy for students to take a video segment from Discovery Streaming and record their voice over it with the facts that they have researched in class. To mute the audio of a segment, you need to be in timeline view. Then select the video, click "Clip" --> "Audio" --> "Mute". If you have more than one video segment, you will need to repeat this process multiple times. (See picture below)


Quick Tip: Converting Slides to .JPEGs in PowerPoint

Did you know you can save your PowerPoint slides as .jpegs instead of a PowerPoint presentation? Why would you want to do this? Well, you would be able to import your slides into Photo Story and Movie Maker since both programs accept images. Keep in mind when you turn your PowerPoint slide into a .jpeg, you lose all functionality of the slide (No effects, transitions, or animations are saved). Essentially, you are taking a picture of your PowerPoint slide. To do this, create your PowerPoint slide. Go to "File" --"Save As". At the bottom of the window where it says "Save as Type", pull down the window and choose "JPEG File Interchange Format". Now you can import the .jpeg into any program that supports picture files.


Related Post: